Showing posts with label Functional. Show all posts

Friday, 26 June 2015

Role-based security in Microsoft Dynamics AX [AX 2012]

Basics of Security Feature in AX:

In role-based security, access is not granted to individual users, only to security roles. Users are assigned to roles. A user who is assigned to a security role has access to the set of privileges that is associated with that role. A user who is not assigned to any role has no privileges.
                In Microsoft Dynamics AX, role-based security is aligned with the structure of the business. Users are assigned to security roles based on their responsibilities in the organization and their participation in business processes. The administrator grants access to the duties that users in a role perform, not to the program elements that users must use.
                Because rules can be set up for automatic role assignment, the administrator does not have to be involved every time that a user's responsibilities change. After security roles and rules have been set up, business managers can control day-to-day user access based on business data.


1. Security Roles
All users must be assigned to at least one security role in order to have access to Microsoft Dynamics AX. The security roles that are assigned to a user determine the duties that the user can perform and the parts of the user interface that the user can view.

2.Process Cycles:
A business process is a coordinated set of activities in which one or more participants consume, produce, and use economic resources to achieve organizational goals. Process cycles are used for organization only. The process cycles themselves cannot be assigned to roles.

3.Duties:
Duties correspond to parts of a business process. The administrator assigns duties to security roles. A duty can be assigned to more than one role.You can assign related duties to separate roles. These duties are said to be segregated. 

4. Privileges:
In the security model for Microsoft Dynamics AX, a privilege specifies the level of access that is required to perform a job. Privileges can be assigned directly to roles. However, for easier maintenance, it is  recommend that you assign only duties to roles.

5. Permissions:
Each function in Microsoft Dynamics AX, such as a form or a service, is accessed through an entry point. Menu items, web content items, and service operations are referred to collectively as entry points.In the security model for Microsoft Dynamics AX, permissions group the securable objects and access levels that are required to run a function. This includes any tables, fields, forms or server side methods that are accessed through the entry point.Only developers can create or modify permissions.Permissions may be Read,Write,View/Edit etc set on menu items.

Wednesday, 24 June 2015

Accounting Cycle in Microsoft Dynamics AX 2012

As we know that organization operations such as purchases, sales should be recorded as transactions that credits/debits amounts from one accounts to others. The motto is to learn all the steps from the business operation till the financial statement. This flow is called the accounting cycle. These are the core responsibilities of an accountant person.
It can also be defined as the accounting cycle is the sequence of procedures used to keep track of what has happened in the business and to report the financial effect of those things. 
These are the things which occurs in accounting cycle:
1. Operations: Purchases/Sales occurs in  business.
2. Computerize/Record the purchase/sales: It is necessary to keep track of all things, so that accounting Dept has a record of all the information about sales and purchases that occurs in business.
3. Analyse: The most important step is to analyse the things.The goal is to write correct transactions.We need to analyse things such as “What happened?” , “What accounts will change?”(Asset, Liability, Owner’s Equity) , “How will they change?” (Will the accounts increase or decrease?) , "Debit or Credit?" (Debit is “good” for the company, Credit is “bad” for the company.).
4. Journalize: The main journal for an accountant is the General Journal. General Journal is used to write transactions to it.Accountant hold this responsibility.
5.Post: We need to post the transactions, because amounts are transferred from one account to another.
6.Trial Balance: A trail balance is a list of all accounts and their balances.checks the accounting equation: Assets = Liabilities + Owner’s Equity.
7.Adjustments: Adjustments are nothing but changes in any purchases or orders made or you can say that they are entries are made at the end of a period to track revenue and expenses.
8.Financial Statements: They are the Balance Sheet, Income Statement, and Cash Flow Statement.
9.Close: The accountant closes the transactions.The reason for the closing entries is to ensure that each revenue and expense account will begin the next accounting year with a zero balance.


Tuesday, 23 June 2015

SSRS Reporting Framework Terminologies in Microsoft Dynamics AX

As you all know, the reports in AX 2012 have moved to SSRS reporting, so MS has introduced a robust reporting framework wrapping over the basic SSRS reporting functionality. There are many terms used in reporting framework in AX that I will try and explain here:

1.Report Definition Language: RDL is an XML application primarily used with Microsoft SQL Server Reporting Services. RDL is usually written using Visual Studio. AX has Report Definition Language Contract classes that can generate and build the RDL for an AX SSRS report. This contract provides a weakly typed representation of parameters. It contains methods that can be used to get or set values. It also contains a map of parameter names and the SrsReportParameter class. The base class is SrsReportRdlDataContract.


2.Report Data Provider (RDP): A framework that helps in building, processing and rendering data to reports. Most of the reports require RDP classes that help in implementing business logic required to process data and provide data in readable, presentable and required formats design. The base class is SrsReportDataProvider. This class has two main sub classes, SrsReportDataProvderBase and SrsReportDataProviderPreProcess. We will discuss about these classes in future posts.

3.Report Data Contracts: The Report Data Contracts framework is used to provide and manage the parameters to an SSRS report. The report data contract contains all the other relevant instances like Report Data Provider contracts, print contracts, RDL contracts and query contracts that will be used by a report.
         
            3.1. Printing Contracts: The framework that manages report printing (to different mediums). The base class is SrsPrintDestinationSettings. There are other supporting contracts that are used for printing, we will discuss about them in future posts.

            3.2. Query Contracts: This framework manages the queries used to process report data. This framework is also responsible for providing dynamic filters (similar to our ‘Select” buttons on report dialogs that open the Query specification form to filter data on report queries).

4. Report Controllers: Report controllers control the report execution and dialog forms. Report controllers can be used to modify report dialogs, validate report parameters and other validations necessary before report execution. The base class is SrsReportRunController. Reports utilizing report controllers can only be used for printing data on client side. Reports controlled by controllers cannot be used in Enterprise Portals.

5. Report UI Builders: UI Builders are used to modify the report dialogs at run-time or to add additional parameters and write custom business logic to report dialogs. Ex: You want to perform some task based on data modified for one parameter, that affects other parameters or build a custom lookup etc (something that was provided by RunBaseReport framework class in previous versions. The base class is SrsReportDataContractUIBuilder.

These are some of the basic reporting terminologies that you will be using extensively for reporting in AX.

Thursday, 11 June 2015

Sales Order Process in AX 2012 in 7 simple steps

Here are the steps:

Step 1: Select Account Receivable >> Common >> All Sales Order
Step 2: Click Sales Order on the new section of the action pane.
Step 3: Input required information in Sales order header screen and Click Ok
Step 4: After clicking Ok on the above Sales order form.  Sales line screen will be displayed as below;
            Input Item details, other required information and required number of sales qty etc.
Step 5 : Click Sell menu(tab) in action pane and Click Sales order confirmation option.(Confirming Sales Order)
(Note :  Sales Order confirmation screen will be displayed; Select required information (Print options) and click Ok)
Step 6: Click Pick and Pack menu and click Packing slip option of action pane.(Posting Packing slip)
(Note : Packing slip dialog box will be displayed.  Input Packing slip Qty and click Ok.). 
Check the Sales order status; order status should be “Delivered”
Step 7 : Click Invoice menu and click Invoice option (Invoice in Sales order).Check the Sales order status; order status should be “Invoiced”.

Thats It!


Wednesday, 10 June 2015

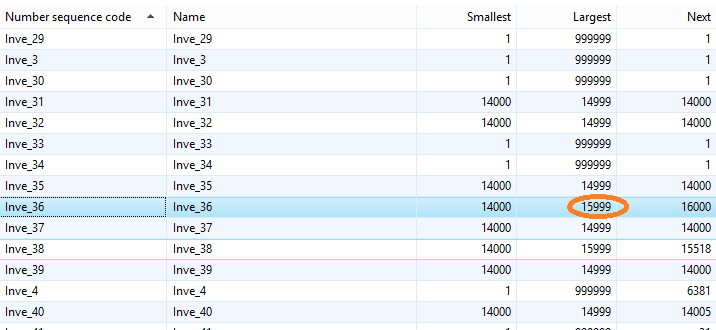
Error : Number Sequence has been exceeded AX 2012

Number Sequence has been exceeded AX 2012

Number sequence Invent_xx has been exceeded.Here are the steps
1. Go to Organization administration >> Common >> Number sequences >> Number sequences.
Number sequence Inve_36 has been exceeded 1

2.Find the number_sequence_code which you are getting error. Then edit the specific number_sequence_Code which you are getting the error.
3.Increase the Alphanumeric value in it. Then increase the largest number allocation.
4.Now save and exit.

Purchase Order Process

Purchase Order Process

  1. Open AX >> Go to Procurement and sourcing >> Purchase Order >> All Purchase Order
  2. Click on (New) Purchase Order at the new section in Action pane.
  3. Fill/Select the vendor account and rest of  the fields are auto filled >> Click ok.
  4. Then you will see the purchase order form and line items in it.
  5. Fill the required fields and required number of lines in the Purchase order lines section.
  6. After having added the line click on the Submit Button and type a comment and click approve.
  7. Now come back to the Purchase Order list page (page where all purchase order exists) and refresh the page, you will see the created purchase order.